Reverse engineering #1
Monday, October 17th, 2011Part of the fun of repairing pens is trying to figure out how the pen was made. In some cases, to repair the pen you first have to dig to find out how the pen was made. In other cases you have to sit down the the broken part and your measuring tools and work out how the pen was made.
Case one is an Italian pen made around 1939. It’s a beautiful celluloid Aurea, made I am told, buy Columbus pen. Many of the parts were direct copies of Parker parts – the section button, etc. It had a Parker nib, obviously incorrect since the original would have been steel. The nib that’s now in the pen was a damaged Parker Duofold nib. I gold soldered the crack, but some of the imprint was lost. I removed the imprint, polished the nib, then masked it and frosted the surface. I like the results. In person, it’s stunning.
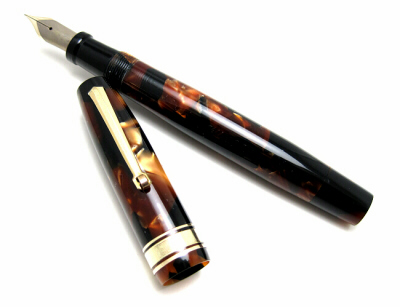
The pen had one significant problem – the inner cap was damaged beyond repair and had to be replaced. There is about a zero chance of finding another cap from which to harvest the inner cap. I was able to solvent weld the pieces of the cap together enough to take some measurements, which allowed me to make another cap.
This is the original inner cap:
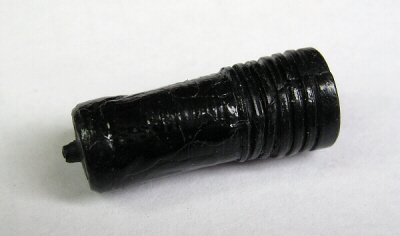
You can see that it’s in pretty bad shape. Important factors: First, the outside. The cap has two different outside diameters – the threaded area has to be larger. Second, the pin at the end. This pen fits into a hole in the clip, and holds the clip in place. Third the threads on the cap are left hand.; Forth, the inside diameter has to be big enough (length and diameter) for a large nib to clear.
The reason for the left hand threads is simple. When you tighten the cap on the pen, the section tightens firmly against the edge of the section. When you unscrew the pen, it pulls against the inner cap until it releases. If the inner cap had a standard right hand thread, it would tend to loosen and come out as the pen is removed. With a left hand thread, it instead tightens, so remains snugly in place.
Measuring diameters, lengths, thread pitch, reasoning out why certain elements are the way that they are.
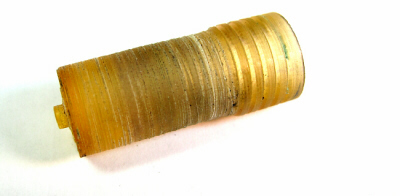
Here’s a picture of the finished inner cap. Not pretty, but it’s stuck inside where it can’t be seen, so a polished finish wouldn’t be worth the investment in time. I used acrylic because hard rubber is a bit too brittle, and I had the acrylic on hand. If I were to do it again, I would use Delryn, which is tougher and easier to machine.
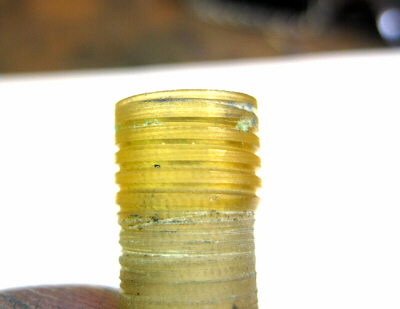
The last interesting bit was the left hand thread. The threads are cut left to right instead of the usual right to left. Because the section tightens against the inner cap edge, that edge has to be unbroken. If there is a break of any kind you end up with an air leak, and the nib will dry out. Therefore you have to pull the bit back before it reaches the open end so that the thread does not cut across the edge of the inner cap. But it can be done.
How long did it take? A couple of hours perhaps. But worth the investment in time.
The pen is not for sale.