Archive for October, 2011

My Parker 51 doesn’t hold any ink!!

Monday, October 31st, 2011

Every so often a thread pops up on FPN, or I receive an email from a client saying that their Parker 51 doesn’t seem to be pulling in any ink.   “I fill it, and it seems to be OK, but I only get two or three drops out of the pen.”   Now there are occasions where something really is wrong with the pen, maybe the breather tube is damaged or missing,  but often there is not.  The pen is filling just fine, it writes fine, but their understanding of how a 51 works is, well, lacking.

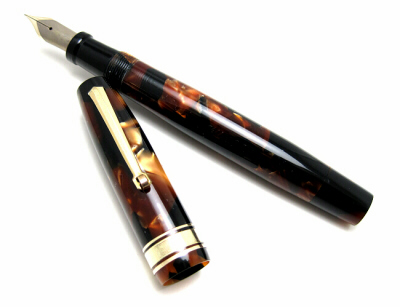
The Parker 51 is one of the best pens ever made.  Steady, tough, reliable, it’s rare for one to flood unless it’s filled wrong.  It’s designed to take in a maximum amount of ink, which can take several strokes of the filler.

To be able to do this and not push the ink back out on each stroke the 51, like the Vacumatic, uses a breather tube.  With each stroke of the filler pump, or squeeze of the pressure bar, air is pushed out the breather tube which is larger in diameter than the slit in the feed.  When the filler is released, ink is drawn up the breather tube, and it flows over the top into the barrel.  Each time the filler is pressed or squeezed, more air is pushed out the breather tube but the path back out for the ink is restricted.  The process is repeated until the level of the ink reaches the top of the tube.  No more ink can be drawn into the pen because it’s pushed back out of the breather tube with each pump.

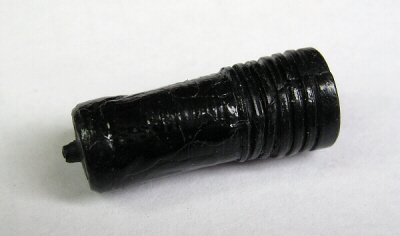
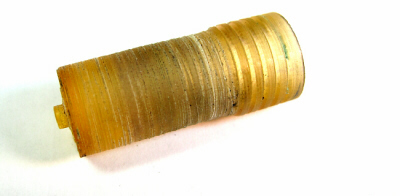
Add to the filling process the collector in a 51.  Under the hood is a collector that has what seems like a gazillion little fins.  These fins catch any extra ink that comes down the feed, keeping the pen from flooding as you write, or the ink expands in the barrel from either body heat or changes in air pressure.  It’s all designed to keep the ink in the pen unless it comes down the feed to the tip of the nib as it’s supposed to – and it works very well thank you!

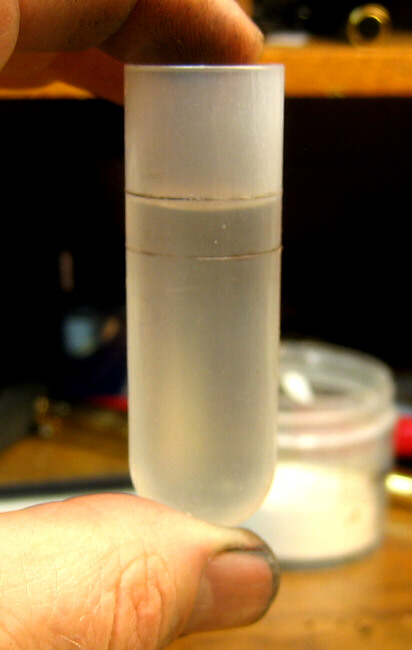
You can see why measuring how much ink comes back out of a pen after it’s filled can lead to the impression that the pen is not working right.   You don’t get much back out, and you’re not supposed to.  Parker recognized this, and gave dealers a way to demonstrate that the pen was indeed filling as it should.  This illustration appears in the 1946  Parker service manual.  It’s described as a tube to “test the capacity of  Parker 51 pens.

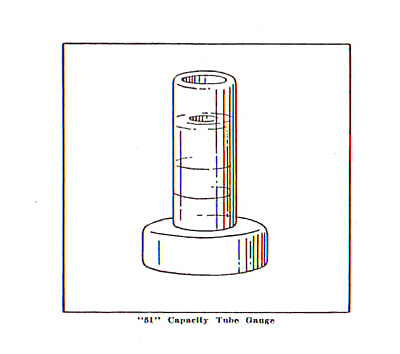
A repairman or dealer would fill the tube to the top line with water, then fill the pen cycling the pump 10 times, pulling the pen out of the tube on the 10th stroke.  If the water or ink had dropped down to the level of the second line, the pen was working properly.  The manual also suggests that it’s a good way to demonstrate how to properly fill the pen.

When I read the manual, I realized that I need a similar way to test 51s, so I made my own testing tube.   As a matter of fact, I made a couple of them so that I could always find one.   It’s proven to be very handy in testing a 51 both before it goes out, and if one comes in for a warranty repair.

You can make one yourself.  Any tube that’s about the same diameter will work.  My 51 tester is made from a paint ball tube.  The tube is about 0.700″ in diameter, and the marks about 0.300 inches apart.  I fill to the top line, and if the the level of the liquid drops to or close to the lower line, the pen is working as it should.   The volume is  about 1.6 – 2 CC if  liquid.  The Vacumatic and aerometric 51 pens hold about the same amount of ink.


Reverse engineering #1

Monday, October 17th, 2011

Part of the fun of repairing pens is trying to figure out how the pen was made.  In some cases, to repair the pen you first have to dig to find out how the pen was made.  In other cases you have to sit down the the broken part and your measuring tools and work out how the pen was made.

Case one is an Italian pen made around 1939.  It’s a beautiful celluloid Aurea, made I am told, buy Columbus pen.  Many of the parts were direct copies of Parker parts – the section button, etc.  It had a Parker nib, obviously incorrect since the original would have been steel.   The nib that’s now in the pen was a damaged Parker Duofold nib.  I gold soldered the crack, but some of the imprint was lost.  I removed the imprint, polished the nib, then masked it and frosted the surface.  I like the results.  In person, it’s stunning.

Aurea pen

The pen had one significant problem – the inner cap was damaged beyond repair and had to be replaced.  There is about a zero chance of finding another cap from which to harvest the inner cap.  I was able to solvent weld the pieces of the cap together enough to take some measurements, which allowed me to make another cap.

This is the original inner cap:

Aurea inner cap

You can see that it’s in pretty bad shape.  Important factors:  First, the outside.  The cap has two different outside diameters – the threaded area has to be larger.  Second, the pin at the end.  This pen fits into a hole in the clip, and holds the clip in place.  Third the threads on the cap are left hand.;  Forth, the inside diameter has to be big enough (length and diameter) for a large nib to clear.

The reason for the left hand threads is simple.  When you tighten the cap on the pen,  the section tightens firmly against the edge of the section.  When you unscrew the pen, it pulls against the inner cap until it releases.  If the inner cap had a standard right hand thread,  it would tend to loosen and come out as the pen is removed.  With a left hand thread, it instead tightens, so remains snugly in place.

Measuring diameters, lengths, thread pitch, reasoning out why certain elements are the way that they are.

Here’s a picture of the finished inner cap.  Not pretty, but it’s stuck inside where it can’t be seen, so a polished finish wouldn’t be worth the investment in time.  I used acrylic because hard rubber is a bit too brittle, and I had the acrylic on hand.  If I were to do it again, I would use Delryn, which is tougher and easier to machine.

Completed inner cap

The last interesting bit was the left hand thread.   The threads are cut left to right instead of the usual right to left.   Because the section tightens against the inner cap edge, that edge has to be unbroken.  If there is a break of any kind you end up with an air leak, and the nib will dry out.  Therefore you have to pull the bit back before it reaches the open end so that the thread does not cut across the edge of the inner cap.  But it can be done.

inner cap end

How long did it take?   A couple of hours perhaps.   But worth the investment in time.

The pen is not for sale.

Nib work (hey, this pen writes by itself!)

Wednesday, October 12th, 2011

I’m a fan of books about WW II aircraft, and all that stuff.   Given the chance, I’ll spend hours reading the books and looking at pictures.  I love air shows, especially when I have a chance to get into one of the airplanes.   A tour through a B17 was an eye opener.  One real treat though was when I got into a B29.  Really.  The (then) Confederate Air Force B29 FIFI was in Syracuse for a few days.  A kid who was working for me doing lawn work at the radio station knew a guy who was a pilot for Eastern Airlines (this tells you how long ago it was), who was one of the pilots that flew the plane. We were in.  While I didn’t get a chance to go into the back part of the aircraft, I did get onto the flight deck, look down the connecting tunnel, and watched while they worked on one of the engines.  Seeing the thing take off on a test flight was cool.  I came that close to getting to fly in it out to Michigan.  The only thing that stopped me was that I couldn’t figure out how to get back.  Bummer.

In case you don’t believe me, here’s a picture of a much younger and thinner me (with hair no less) on the flight deck.

But I digress…

What caught my eye as I was reading through a book was a comment that once in a while an aircraft would come off of the line that just about flew itself.  These things were made with the same parts, to the same specifications by the same crews, but once in a while one came out that was just right.

I think that the same thing happens with pens.  Manufacturers have the same parts, same people, and most of the nibs are acceptable and write to most people’s expectations.  But then you get one that’s just right.

I dare say that few folks ever experience a really good nib.  Most experience nibs that are good, or pretty good.   The job of a “nib meister” or skilled repairman is to produce pens that write better than the average nib, to consistently produce pens that “fly themselves.”

It is my contention that this skill is not learned over night.  It takes years to develop a true understanding of what is going on, and what it will take to make a particular nib into a smooth writer.  It’s nearly impossible to describe, so don’t be surprised if I hedge if you ask me,    On several occasions I have gone back to visit a nib that I worked on several years before, and have been surprised that I was satisfied with the work at the time.   😛    This is one area where experience really does count.

It’s unlikely that I will use the same techniques today that I used even a year ago.  Repair/nib guys are constantly growing and evolving.  If we’re not, we’re dead.  If I were to suggest just one key to learning how to do good nib work it is to observe…. the shape of the nib, the feel of the nib, and what subtle thing you did that made the difference and how you got there.

I think that I do pretty darn good nib work.  But I know that I’ve done really good work when a client writes and says “Ron, that pen you repaired has become a favorite of mine.  I just can’t put it down.”

Some assembly required….

Monday, October 10th, 2011

I bought a rack with plastic bin boxes to hold a bunch of Sheaffer parts the other day.  I have a bunch of Sheaffer sections and feeds, and some other stuff that came out of the Sheaffer service center that needed to be sorted and stored so that they can breathe, not in closed plastic bags.  Long story there…   I had to put the rack together, and as I did so my mind wandered a bit (it didn’t require a lot of concentration), and I got to thinking about the crummy instructions.  I relied more on the pictures on the box than the instructions or the pictures contained therein.  I think that there is a special purgatory for people who write instructions like that…  or there ought to be.

I concluded that if you’re going to buy something from Harbor Freight (AKA the Toy Store) you need to have at least some level of mechanical skill before you start.  That thought lead me to thinking about a review of a part on the Radio Shack web site.

Before leaving my job of 25 years to repair pens full time, I was a radio engineer.  I built a fair number of translators, and  3 radio stations, engineering the whole project for WMHQ up on the northern border of NY state.   I still go out on the odd service call, just to keep myself up to date.
Broadcast engineers joke about the engineering mantra;  “If all else fails, read the instructions.”  I have to admit that to a certain extent that’s true, and we often get away with it.  The reason is that by the time you get to work on a transmitter or install a system you usually have a fair bit of experience, and have worked with other engineers over many years.   Radio engineers specialize in repairing weird stuff.   Many of the best ones are self taught.   We specialize in walking into what is a baffling situation for everyone else, sorting it out, and making things work, sometimes with little or no documentation to guide us.  BUT, as I said before, we also have a lot of experience with the systems that we encounter, or we know who to ask…  and we do look for manuals.

Back to Radio Shack (engineering joke: “Radio Shack.  You have questions?  We have batteries.”)  I was on  their web site looking for a simple RCA connector, plastic, with solder terminals.  I’ve used the things for almost 30 years.  Why they have “reviews” of basic parts like this I can’t fathom, but they do.  What entertained me though was the whine in a review that “there are no INSTRUCTIONS!”  The response in my head was “well, no, there wouldn’t be.”  The reason is that there are some things that are very basic, and a certain level of  understanding is assumed.  Buy a switch or a connector,  and chances are that you know how to use it and if you don’t,  you know where to find out  (this really was a common-as-dirt part).

Do we really have to spoon feed information to the next generation, especially when there is the Internet and the power of search engines to help us?  Want to know what the pin out for an Apple iPod connector is, it’s out there.  Want to know what the pin out is for a USB connector, and what the standards are for the power supplied?  It’s easy to find.  Need to know the color code and pin-out for a CAT-5 cable?  No problem.  So why are we whining about how to use a simple, common, every day, decades-old-design part?

A young man that I know was complaining that everyone in his Physics course got a 76 or below on the most recent test.  My question was, is it because (as he put it) the instructor didn’t teach the material well enough, or because the student(s) hadn’t even taken the wrapper off of the text book?

Food for thought.