Posts Tagged ‘Pen repair’

What, no refill? …or how to revive a Pentel Clicroller.

Wednesday, May 4th, 2016


I really don’t repair ballpoint pens, but a second post about something that isn’t a fountain pen is going to make it hard to convince people.  But really, don’t ask.  I won’t fix one for you…..

~~~~~~~~~~~~~~~~~~~~~~~

There are occasions where I need to carry a roller ball pen.  Ballpoints  (shudder) aren’t on my radar, but a RB is necessary on occasions, and they roll easily enough that I’ll use one.  My usual choice is a Retro 51 Tornado.  Somehow I’ve accumulated a few.  They have cool designs, nice feel, but the truth is that  most of the time they sit in the turret next to my “office” chair.

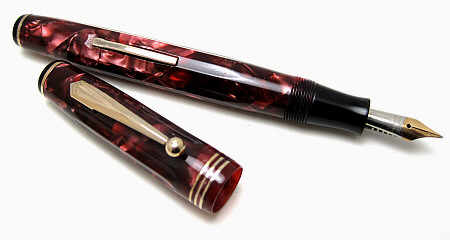
Twenty or more years ago Pentel made a pen called the Clicroller. Not too thin, not too fat, the clip is similar to a Sheaffer reminder clip in that you can’t clip it in your pocket with the refill extended.  That’s important if you (like me) are prone to forgetting to turn the knob to retract the point.  The only time I’ve ruined a shirt was with a rollerball in my pocket, never a fountain pen!

Pentel quit making the refills years ago, but the pens are still around.  Some were anodized aluminum, some slim and striped with a matching watch (lost that one), some lacquer with gold plated trim.  Robyn lost the green and gold one that we had…  or one of the boys swiped it.   Not that it matters.  The point is that I went looking for it one day, couldn’t find it,  and never did see the thing again.

To give you an idea what I’m talking about, here are a couple that I picked up at the Chicago show….


A number of years ago I got to thinking, and pulled out my Clicroller with its dried out refill and a pair of calipers, and started noodling around.  It didn’t take long before I figured out that I could fit a short Schmidt refill into the pen, and that it would fit through the cone in front, but it was too short, and didn’t fit into the end of the barrel.  So I made a widget, or adapter if you will, that lets me use the short Schmidt refill in the pen.  V1.0 worked perfectly.  The button on the end of the refill fits into the widget, the long rod on the other end mimics the over all length of the Pentel 8126 and fits into the barrel perfectly. Note in the picture above, that the point of the refill extends just the right distance from the cone.

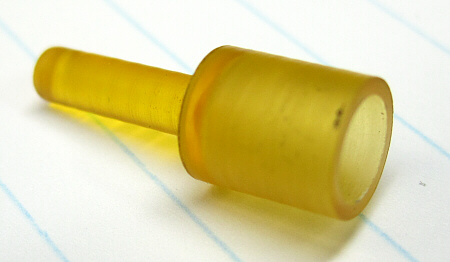
I was going cheap and quick,  and wanted to see the how the button on the end of the refill fit inside for this one, so  I made it out of acrylic.  Since all of the stress is axial, it worked.

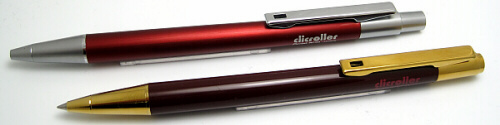
But then I recently picked up the two in the picture, both new, in the box.     So I decided to make a couple more widgets so that the pens can be used again.

At the moment, I have no intention of making these for sale.  I’d have to charge as much for the widget as you are likely to pay for the pens.  So here’s what you need to know if you want to make one yourself.

Use 1/4″ rod stock.  Brass or aluminum will be easy to machine.  You can use Delrin too – I just like the idea of a metal widget.   Overall length is 0.745″  A little shorter is OK, but I wouldn’t go under 0.735″   The length of the narrow end is 0.415″, and its OD is 0.120″, though this isn’t critical.  You can safely go to 0.125″  The hole in the wide end is drilled with a #8 drill, which is 0.199″  There is just enough grip that the widget doesn’t fall off of the end of the refill.   It should be 3/16″ deep not including the tip of the drill.   I drill into the end until the shoulder is even with the end of the work piece, reset to zero, and then drill in 3/16″ using the scale on the tail stock.  Round off the corners with a mill bastard file, and you’re done.  Total time, maybe 10 minutes.

Here’s the Schmidt refill next to the original Pentel refill.  The tip of the orignal Pentel refills and the Schmidt refills are within a thousandths of an inch of each other:

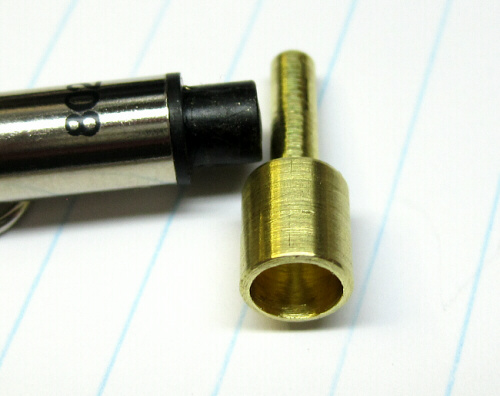
…and a close up of the brass widget, showing the open end:


It should be possible to make a widget so that you use a DIN/Parker refill.  The difference is that instead of a hole for the end of the refill, you have to make it shorter, and with a pin that will fit in the end of the Parker refill.  The Parker will fit in and through the cone on the front of the pen, though you may want to change the spring.  V3 for the Parker is still in process at this writing, though I can tell you that you need to have at least part of it the full 1/4″.   Smaller,  and the clip can’t latch with the mechanism in the forward position.

No silver bullets……

Thursday, October 17th, 2013

Latex sacs in pen are nothing new.  The introduction of the latex sac to hold the ink was however, a radical idea when it was introduced a hundred years ago. (shocking how time flies!)  Radical enough that the “eyedropper” or “safety only” crowd was left scrambling to catch up, and the patent battles that developed were as common as they are today between Samsung and Apple.

The problem is, that wonderful idea had a built in flaw in that the sac starts to break down, heading for the inevitable failure the first time the pen is filled.  It was true back then, and is true a century later.  That flaw spawned a lot of research into alternatives and better materials.  Piston fillers, plunger fillers, aerometric fillers, and eventually the piston converter were all ways to get around the problem of a sac.  But they came with their own set of problems. The development of Parker’s “plyglass” sac (really PVC) was a biggie, and one of the reasons for the popularity of, and long life of, the Parker 51.  I’ve had Esterbrook pens with project numbers stamped on them.  The source was from the estate of a man who was a chemical engineer for Esterbrook.  The only thing that I can think of is that these pens were being put in to real world use to test something, and I think that they were testing rubber compounds for their sacs.  Esterbrooks sacs are the toughest that I’ve seen in any pen.  I often find the pens with the original sac in the pen, many times still in fine shape though the rest of the pen shows evidence of serious use!

Fast forward to today.  The legacy of the latex sac lives on, and it’s disposition to fail, simply leaking, turning to goo and eventually becoming petrified is one of the reasons why I’m in business.  They fail.  Some sooner than others, but they eventually fail.

Those of us who repair pens for a living have seen a startling, indeed perhaps alarming, trend of premature failures in pens sacs happening at an increasing rate over the last 5 or 6 years.  There’s a lot of discussion about the cause, but it often comes back to one of two things – the material used to make the sac, and the ink used in the pen.    When I dig and ask questions about how the pen was used, I find that one of the modern super-saturated “boutique inks” like Noodlers or Private Reserve, or a saturated ink containing red die was used in the pen.  Failure sometimes happens in a matter of a couple of months, sometimes it takes several months or a year.

This is very frustrating for a professional pen mechanic.  We can do everything possible to make a pen write very well, as it should.  We buy the best materials we can to restore the pen, only to see the sac fail in a few months instead of several years later as had been the case a decade ago.  The most likely causes are the things over which we have absolutely no control – the material used to make the sac, and the ink that the owner chooses to use in their pen.

So one asks, why don’t you just use one of the synthetic sacs?  The sacs from north of the border were sold as “silicone” and work very well.  I’ve used them for years.  But some testing in the last year or so revealed that the sacs currently in production are not silicone, but PVC.  “So what?” you say.  They used PVC sacs in Parker 51s for years without any problems.  Well, almost no problems.  We see a fair number of aerometric 51s with sac nipples that are soft…. soft enough that they can fail and tear.  The reason?  The plasticizer leaches out of the PVC and softens the celluloid of the sac nipple.  Once it turns soft, it can not be reversed.  The same thing can happen to a celluloid PEN.  The PVC sac in a Duofold Sr. could soften the barrel from the inside out, and once soft it can not be reversed.  It would take a long time, and we might not notice, but it would happen.  The difference with a 51, or a PVC sac in say a Sheaffer snorkel, is that the sac never comes in contact with the barrel because of the metal sac guard.

So a true silicone sac was developed. The theory being that they are more or less inert, like the PVC are not degraded by contact with ink, and will not release the plasticizer that can have a negative impact on some plastics.  Cool.  Except that they come with their own set of issues.  Silicone doesn’t stick to anything but silicone.  So you have to use a silicone RTV adhesive, and a particular kind that will not release acetic acid as it cures.  And that non corrosive RTV (room temperature vulcanization) should be a type that releases an alcohol VS a ketone.

There was great joy in the shops of pen mechanics because even though you had to use a special adhesive that takes longer to set and therefore slows you down, maybe, just maybe we finally had a sac material that would provide the long life and resistance to damage from modern inks that we desire.

But then we found out about the gas permeability issues of silicone sacs.  The short form here is that the silicone sac allows some gasses to pass through the wall of the sac.  In other words, to some gasses but not the ink, the walls of the sac are porous.  That means that the controlled leak of the fountain pen may not be quite so controlled.  If a pen is stored on it’s side rather than nib up, you could end up with an oozing pen or in the worst cases, a cap full of ink.  I’ve heard of cases where this has happened, but I also have them in several pens, and have had clients testing and watching for oozing without having it happen.

So what should a pen mechanic do?  I still use latex sacs, because they work best in most applications.   They stick better to the sac nipple than PVC or silicone, they fill well, and they are less likely to tear.    They’re the only option for Parker Vacumatic filled pens.  But they are not the best thing to use in a Sheaffer snorkel.  Sac failure usually results in ink in the barrel, and if not corrected in time it means a rusted spring, screw, and in really bad cases damaged sac guards and Touchdown tubes.

Some folks really want their saturated inks, no matter what.  Snorkels demand a synthetic sac to prevent damage to the internal parts, and they’re a good idea on PFM and Touchdown pens too.  But both synthetic sac materials as we have noted have issues.

In general then,  if you want to use a synthetic sac so that you can use you boutique ink,  use a PVC sac in a hard rubber pen or a pen with a sac guard that keeps the sac from contacting the inside of the plastic barrel wall.  But I think that the silicone sac is the better material in most applications as long as you are willing to accept the possibility  (not probability) of oozing.

Every option has it’s trade offs.  There are no silver bullets.


The Pen That Started it All…

Tuesday, December 6th, 2011

OK, almost started it all.

Back in the late 80s a co-worker gave a couple of pens to me.  They had been her mothers, and she knew that I liked fountain pens.  A simple Esterbrook SJ, and a Parker Parkette Deluxe.  Nothing big but to a neophyte,  exciting.  Both needed to be repaired, but I had no idea how to do it. BUT, I had heard about this guy in Center City Philadelphia who “could repair any pen made, going back to 1900.”  So I tracked the shop down, and sent my pens off to Mr Russel at Tuckers Pen Hospital down on Chestnut street, near I. Goldbergs, just a couple blocks west of Independence Mall.  We won’t discuss my impatience to have the pen repaired.

The pen needed a nib, needed to be resaced, and generally restored.  Total bill when he was done, an astonishing $145 and change.  (For reference, in the late 80s he was charging $90 to restore a Sheaffer Snorkel).  I still have the receipt somewhere, and may even have the shipping tube.  I certainly do have the pen, 23 years or so later.

1st Quarter 1935 Parkette Deluxe

It’s a nice pen, great color, with a medium nib that writes smoothly.  I don’t know where Mr Russel got his sacs, but I would love to know.  I pulled the pen apart the other day, and found that the sac is as clean and fresh and good as it was the day it was installed.  I know it’s the same sac because it’s stamped in bright orange Tuckers Pen Hospital.

The one think that I didn’t like was the treatment of the brassed trim.  Everything was brassed.  Since my parents lived about 30 miles outside of the city at the time, I went down to pick up the pen.  When I commented on the brassed trim, he disappeared with the pen back into the repair area.    My memory is that he appeared a bit later with the pen in hand, the trim shiny and bright.  He said “I put something on it, nobody will ever know.”  Except that I knew, and that the surface of the celluloid now had a slightly stippled look to it.  The lacquer or whatever he sprayed on it eventually wore off, and the brassing was back.   I finally took care of that little issue this past week by cleaning the metal, and then plating it.  Now you can see why these were popular pens.  Thin plating, yes, but still a quality Parker pen, comparable in size to the Challengers and Duofold Jrs of the day.

I sent one or two more little items off to Tuckers, and then quickly learned that if I wanted to collect on my radio engineer’s income, I needed to learn how to repair.  About the same time, I came across repair manuals from the Pen Fancier’s Club and heard about the Pen Sac Co.  The rest, as they say, is history. Within a year or so after receiving the Parkette I was haunting every antique show in town, and buying anything of interest just to be able to repair the pens.  The habits and skills developed over 20 years ago are with me today – I still repair a pen as if it were going into my own collection, not just to push it out the door.  It’s a habit that I don’t intend to change.

A footnote to the story.  Years later David Isaacson called me and told me about a guy from Philadelphia who was selling a bunch of pen stuff.  It seemed that his father had owned a pen repair shop in Philadelphia.  As he rambled on  I got to thinking, and then interrupted.  “Is the guy’s last name Russel?” I asked.  It was.    The elder Mr Russel gone, the shop closed.  But I will never forget visiting that little shop on the second floor down on Chestnut St, and the excitement of being in a pen repair shop, seeing other vintage pens, picking up my repaired Parkette and inking it.

I’m going to keep this pen – if nothing else to remind me of the wonder and excitement of being a new collector, and to get to ink that newly repaired pen for the first time.  I repair pens, but what makes it special is to make the people who own them happy.

My Parker 51 doesn’t hold any ink!!

Monday, October 31st, 2011

Every so often a thread pops up on FPN, or I receive an email from a client saying that their Parker 51 doesn’t seem to be pulling in any ink.   “I fill it, and it seems to be OK, but I only get two or three drops out of the pen.”   Now there are occasions where something really is wrong with the pen, maybe the breather tube is damaged or missing,  but often there is not.  The pen is filling just fine, it writes fine, but their understanding of how a 51 works is, well, lacking.

The Parker 51 is one of the best pens ever made.  Steady, tough, reliable, it’s rare for one to flood unless it’s filled wrong.  It’s designed to take in a maximum amount of ink, which can take several strokes of the filler.

To be able to do this and not push the ink back out on each stroke the 51, like the Vacumatic, uses a breather tube.  With each stroke of the filler pump, or squeeze of the pressure bar, air is pushed out the breather tube which is larger in diameter than the slit in the feed.  When the filler is released, ink is drawn up the breather tube, and it flows over the top into the barrel.  Each time the filler is pressed or squeezed, more air is pushed out the breather tube but the path back out for the ink is restricted.  The process is repeated until the level of the ink reaches the top of the tube.  No more ink can be drawn into the pen because it’s pushed back out of the breather tube with each pump.

Add to the filling process the collector in a 51.  Under the hood is a collector that has what seems like a gazillion little fins.  These fins catch any extra ink that comes down the feed, keeping the pen from flooding as you write, or the ink expands in the barrel from either body heat or changes in air pressure.  It’s all designed to keep the ink in the pen unless it comes down the feed to the tip of the nib as it’s supposed to – and it works very well thank you!

You can see why measuring how much ink comes back out of a pen after it’s filled can lead to the impression that the pen is not working right.   You don’t get much back out, and you’re not supposed to.  Parker recognized this, and gave dealers a way to demonstrate that the pen was indeed filling as it should.  This illustration appears in the 1946  Parker service manual.  It’s described as a tube to “test the capacity of  Parker 51 pens.

A repairman or dealer would fill the tube to the top line with water, then fill the pen cycling the pump 10 times, pulling the pen out of the tube on the 10th stroke.  If the water or ink had dropped down to the level of the second line, the pen was working properly.  The manual also suggests that it’s a good way to demonstrate how to properly fill the pen.

When I read the manual, I realized that I need a similar way to test 51s, so I made my own testing tube.   As a matter of fact, I made a couple of them so that I could always find one.   It’s proven to be very handy in testing a 51 both before it goes out, and if one comes in for a warranty repair.

You can make one yourself.  Any tube that’s about the same diameter will work.  My 51 tester is made from a paint ball tube.  The tube is about 0.700″ in diameter, and the marks about 0.300 inches apart.  I fill to the top line, and if the the level of the liquid drops to or close to the lower line, the pen is working as it should.   The volume is  about 1.6 – 2 CC if  liquid.  The Vacumatic and aerometric 51 pens hold about the same amount of ink.


Shellac – the duct tape of pen repair.

Wednesday, September 28th, 2011

There’s a lot of discussion about shellac.  For such a simple product, it’s surprising how much “press” it gets in the repair forums.

The short description is that shellac is made from crushed bug stuff, mixed with denatured alcohol to make a finish for furniture.  It’s been around a long time, and it’s been used in fountain pens from the early days.  You find it all over the place under different names, like “confectioners glaze”.  Yup, it’s used as a coating on candy. (if you don’t believe me, look it up!)

Pen people use it for all kinds of things like attaching sacs (sold as “sac cement”), securing sections and other things that you don’t want to move, stuff like that.  It’s used because it’s reversible.  Heat will soften it at around 103F, it’s not bothered by water (and therefore ink, which is why it’s used to attach sacs) and it can be removed easily with denatured alcohol… and it’s cheap.  A half pint can bought at a hardware or paint store will cost something like $4-$5.

Now the fun stuff.  Some people insist that for pen repair, you have to mix your own shellac, a 2 lb cut being preferable.  Then some say that you have to use a certain grade or type of dried shellac is necessary. There was a time when I bought the fancy stuff at $10 for a little bottle, and $15 for a larger one.  I can attest to the fact that it does stick well.  It certainly worked to shellac the table cloth to the table at a pen show a few years ago.  (ask me when you see me about that story)

But I abandoned the fancy stuff a few years ago.  The truth is that I have never really found that much of a difference between the fancy stuff that you mix yourself and the basic Zinsser shellac from a can.   The cheap stuff works, sacs stick.   I do use both orange and blond shellac, the later for demonstrator 51 hoods so that the shellac doesn’t show up, and mix them on occasion.  But I simply couldn’t justify the extra expense for the fancy “sac cement.”

But the real clincher for me was when I paid a visit to the Sheaffer Service Center in Ft. Madison with Richard Binder back in 2008.  There on the floor, tucked behind the fountain pen repair station was…  a gallon can of your basic hardware store variety Zinsser orange shellac.  I figured that they had done a few more pen repairs than I have over the years, and if they thought it was the stuff to use, I needn’t argue.