 |
| Main Page |
| About Main Street Pens |
| Restoration Services |
| Our Policies |
| Articles and Essays |
| Pens for Sale |
| We Buy Pens |
| Meet Us at Pen Shows |
| Testimonials |
| Links |
If youre like most pen collectors, youre long on desire, and short on money. So many pens, so little cash! That gap can widen further if you like to collect vintage fountain pens, but cant afford to have all of them repaired by a professional restorer. Thats the reason why most collectors start doing their own repairs. Its inevitable.
So you buy a book, maybe some copies of the old repair manuals to figure out how to do things, a few sacs, maybe some vac diaphragms and dive in. But then you discover that most repairs require a special tool at one point or another, and off you go down another expensive rabbit trail.
Theres a way around that particular problem though, if youre at all handy with tools. I call them cheap tools things youve adapted from other uses to pen repair, or tools youve made yourself. Every pen restorer has a fair number of hand made tools in his or her tool kit, and is quite content to use them.
There is a whole host of repair tools that you can make with just a few simple hand tools, and maybe a power drill. Lets take a look at some basic tools, and how to make them yourself..
When you take a pen apart, heat is your friend. Heat softens the shellac that was used as an adhesive, and expands the barrel making it easier to separate sections and barrels without cracking the barrel.
The old pen repair people used an alcohol lamp to heat a pen to remove the section or heat down a feed for example. This was an acceptable way of heating a pen, given the lack of heat guns and such that we have today. (Note I strongly recommend that you not use open flame to heat a pen. The vintage celluloid pens are highly flammable!) But you dont have a heat gun, and prices start at $25. Enter cheap tool #1 a hair dryer. Ive used one for years and still do. For the less experienced restorer, its better than a heat gun. Since it doesnt produce as much heat things take a bit longer, but then again youre not likely to melt your pen.
Removing the section when heated is the next step. But what do you grip it with? Those section pliers are nifty (really spark plug boot pullers), but they cost at least $25. You dont have a Dremel tool (yet) to grind the teeth off of a pair of slip joint pliers either. Slip joint pliers are one thing that youll have to break down and buy, but cheap ones will do.
Cheap tool #2? While youre out buying the pliers, buy about a foot of automotive fuel line hose, the 5/8" thick walled stuff. Itll cost a buck or two for a foot. Cut a piece about 1/2" long, and slit it down the side. This piece of hose can be slipped over a section (or Parker 51 hood) to provide a gripping surface. Align the piece of hose with the slit UP, so that it will line up with the opening between the jaws of the pliers. The piece of fuel line hose provides traction for turning the section, while protecting it at the same time. I think this method also reduces the chances of bending the section at the joint, and cracking the barrel. Ive used the hose with pliers for 15 years and have yet to damage a section.
If you have an ultrasonic cleaner (sorry, I dont know how to make one of those), you can put the section in to soak, and then use clear water to flush out the nib assembly. There are a number of things that you can use to force the water through the feed. Some folks like to use a sawed off ear cleaning syringe. Koh-I-Noor sold a rubber bulb with a fitting for flushing out technical pens. Funny thing, that bulb that cost $15 looks an awful lot like a slightly modified solder sucker a little desoldering bulb sold by PartsExpress (370-404) for $3.50. Thats cheap tool #3. Ive used the same one for 15 years. Just remove the teflon tip and insert the nipple end of the section. Most sections will fit in the opening of the bulb, though some will be a bit on the snug side.
 Cheap
tool #4 - Many times you can soak and then flush a feed, and
dont have to knock out the feed and nib for the pen to write.
But there are times when knocking out the feed cant be avoided,
like when you need to reset the nib and feed to realign them.
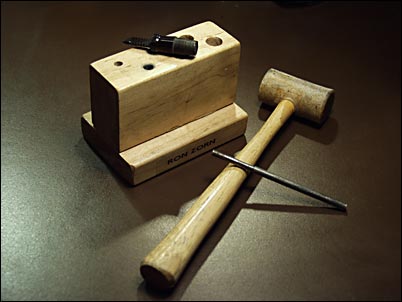
Ive used all kinds of things as a knock-out block, but I
eventually made the one I use today. The first step is to steal
one or
two of your kids wood building blocks. Ask for permission if you
feel guilty about it. I used a piece of hard wood (maple) for my
block.
Any hard wood will work, but dont use a soft wood like pine. My
block is two pieces of wood glued and nailed together to form an
inverted T. The block should be a couple of inches high
to make sure that you have enough depth to drive out a large nib
without hitting the table surface under the block.
Cheap
tool #4 - Many times you can soak and then flush a feed, and
dont have to knock out the feed and nib for the pen to write.
But there are times when knocking out the feed cant be avoided,
like when you need to reset the nib and feed to realign them.
Ive used all kinds of things as a knock-out block, but I
eventually made the one I use today. The first step is to steal
one or
two of your kids wood building blocks. Ask for permission if you
feel guilty about it. I used a piece of hard wood (maple) for my
block.
Any hard wood will work, but dont use a soft wood like pine. My
block is two pieces of wood glued and nailed together to form an
inverted T. The block should be a couple of inches high
to make sure that you have enough depth to drive out a large nib
without hitting the table surface under the block.
I drilled 6 holes in my block in a zig-zag pattern, using the following drill sizes 3/16", 1/4", 9/32", 21/64", 3/8", and 23/64". Looking at my block I can see that Ive never used the largest hole, but have found that it would be nice to have one more in the mid range around 5/16" and 19/64". Mark out the block, and use the smallest drill to drill pilot holes all of the way through the block. Then drill through from the top using the various sizes. Finally turn the block over and drill from the bottom to within about 1/2" of the top with the 23/64" drill. This allows the nib and/or feed to drop easily through the block once its loose. A coat of a polyurethane spray varnish will keep the block from getting too ink stained!
Cheap tool #5 goes along with the knockout block the knockout tool or punch. Youll need a few of these in different sizes. You can use nails varying in size if you like. Just cut off the point and file the end smooth, rounding the corners a little bit. For Parker Vacs and some Sheaffers, youll need a punch with a hole up the middle because of the breather tube or feed design (Balance pens in particular). The automotive store is just the place to buy what you need a piece of 3/16" brake line tubing. A foot might cost you a couple of bucks, if that. Cut the tubing to length (4" is about right), file the ends smooth, remove the burrs in the ends of the tubing and youre in business.
In Pen Repair: Cheap Tools, Part II well talk about Vac wrenches and burnishing tools (among other things!)